Cheesy Garlic Bread Recipe nights usually happen at my place when I realize dinner feels a little boring and everyone wants something warm, cheesy, and fast. You know the vibe, pasta is simmering, soup is on the stove, and suddenly you need that one side that makes the whole meal feel complete. This is the bread I make when I want people to hover near the oven and “taste test” way too early. It’s simple, super forgiving, and it makes your kitchen smell like a garlic butter dream. If you’ve ever ended up with soggy bread or burnt garlic, don’t worry, I’ve been there too. Let’s fix that and make a loaf you actually want to brag about.
Essential Ingredients for the Perfect Garlic Butter Spread
The heart of great cheesy garlic bread is the garlic butter spread. Not just butter and garlic tossed together, but the right balance so it melts into the bread without making it greasy or bitter. Here’s what I always reach for.
- Butter: I like unsalted so I can control the salt, but salted works if you taste as you go.
- Garlic: Fresh cloves give you that real punch.
- Salt: A little goes a long way, especially if your cheese is salty.
- Parsley: Fresh is brighter, dried is totally fine in a pinch.
- Optional flavor boosts: A tiny squeeze of lemon, a pinch of Italian seasoning, or a spoon of grated Parmesan in the butter.
My personal rule: mix the butter until it’s spreadable, not melted. Melted butter soaks in too fast and can lead to that sad, limp bread situation.
Choosing the Best Bread: French Baguette vs. Italian Loaf vs. Sourdough
Bread matters more than people think. The best bread gives you crispy edges and a center that stays soft, not chewy in a bad way.
French baguette is great if you want lots of crunchy surface and smaller pieces that are easy to grab. Italian loaf is my go to for a classic crowd pleaser because it’s sturdy but still fluffy. Sourdough is the bold choice with that tangy flavor that pairs insanely well with garlic and cheese.
If your loaf feels super airy and light, it can get a little too crisp. If it feels very dense, you may need a longer bake to warm the center. I usually choose Italian loaf when I’m serving it with pasta, like on nights when I’m also craving something cozy like garlic parmesan chicken pasta. That combo is just unfair in the best way.
The Ultimate Cheese Blend: Why Mozzarella and Parmesan Reign Supreme
If you want that pull apart cheese moment, mozzarella is the main character. It melts smooth and stretchy without getting oily. Parmesan brings the salty, nutty punch that makes cheesy garlic bread taste like something you’d pay for at a restaurant.
I like using low moisture mozzarella (the block you grate) instead of fresh mozzarella, because fresh can release water and make the top a little wet. For Parmesan, pre grated is fine, but freshly grated melts nicer and tastes stronger, so you need less.
If you only have one cheese, choose mozzarella. If you want it to taste extra “finished,” add Parmesan. That simple.
Fresh Garlic vs. Garlic Powder: Professional Chef Secrets for Flavor Depth
Here’s the truth: both have a place. Fresh garlic gives you that real bite and aroma. Garlic powder gives you an even, roasted kind of garlic flavor without the risk of burning little garlic bits on top.
My favorite “secret” is using both. I mix fresh minced garlic into the butter, then add a light pinch of garlic powder too. That way you get depth, not just sharpness. Another tip: let the garlic butter sit for 5 minutes before spreading. It sounds silly, but it helps the garlic flavor move into the butter a bit more.
And one important note: if your garlic is old or sprouting, it can taste bitter. Use fresh cloves when you can.
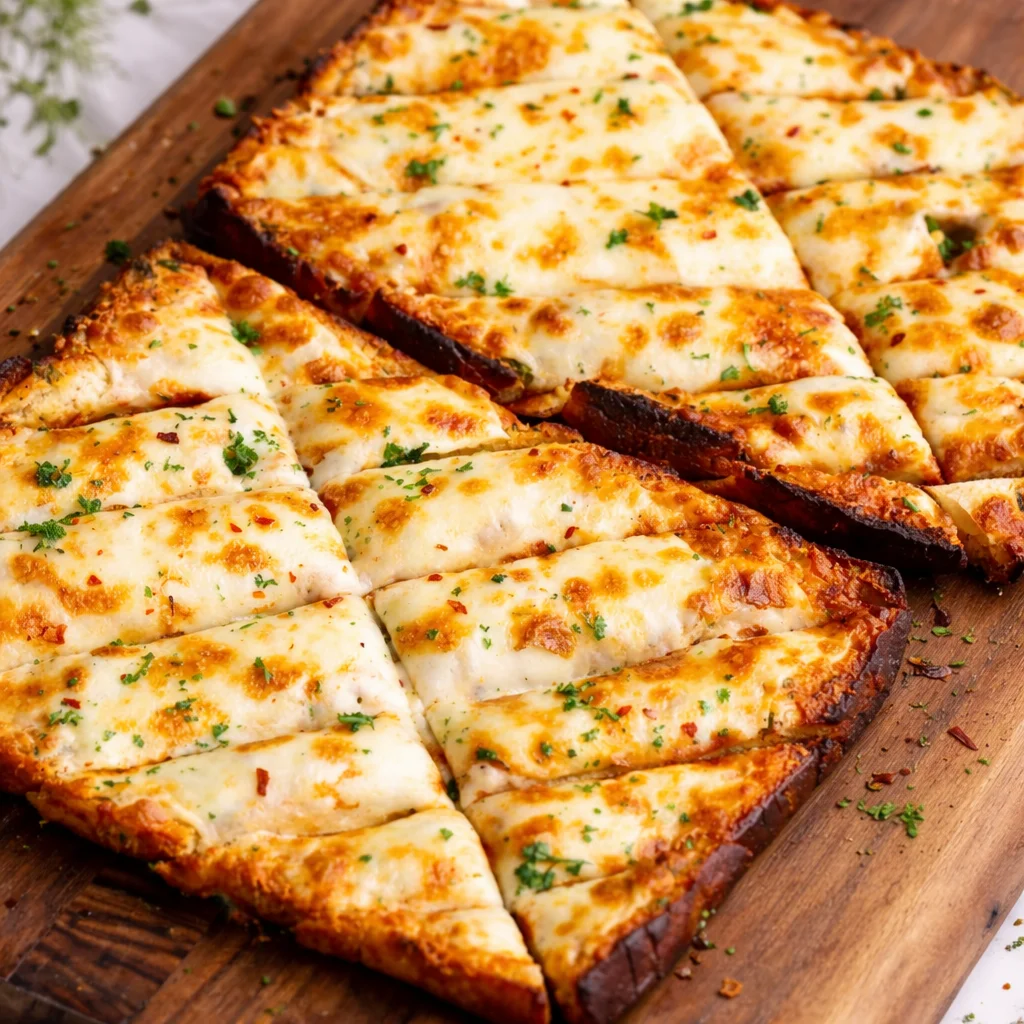
Step-by-Step Instructions: How to Make Cheesy Garlic Bread from Scratch
This is the part where it all comes together. I’ve made this so many times I could do it half asleep, and honestly, that’s kind of the goal for a weeknight recipe.
- Preheat your oven to 400 F.
- Slice your loaf lengthwise (or into rounds if using baguette).
- Mix softened butter with minced garlic, salt, parsley, and a pinch of garlic powder.
- Spread the garlic butter generously all over the cut sides.
- Top with mozzarella, then a shower of Parmesan.
- Bake 10 to 14 minutes until the cheese is melted and bubbly.
- Broil 1 to 2 minutes if you want golden brown spots (watch closely).
- Cool 2 minutes, slice, and serve warm.
If you’re making this alongside wraps or a quick lunch situation, it’s also amazing with something like cheesy garlic chicken wraps. Garlic on garlic is not a problem in my house.
Pro Techniques for the Perfect Texture: Crispy Edges and a Soft Center
The texture is what separates “pretty good” from “why can’t I stop eating this.” My trick is to bake on a sheet pan and keep the bread cut side up the whole time.
For crispy edges, don’t overload the butter right at the crust line. Butter loves to drip, and drips can fry the edges too hard. Spread evenly, then add just a bit extra in the center where you want softness.
Also, shred your own cheese if you can. Bagged shredded cheese often has coating ingredients to prevent clumping, and it can melt a bit less smoothly. Not a dealbreaker, just a little tip that helps.
The Moisture Barrier Trick: Pre-Toasting for a Non-Soggy Bottom
If you’ve ever taken a bite and the underside feels damp, this fix is for you. Pre toast the bread for a few minutes before you add cheese.
Here’s how I do it: put the sliced bread in the oven plain for 3 to 4 minutes. Pull it out, then spread the garlic butter and add cheese. That quick toast makes a light barrier so the butter stays flavorful instead of soaking through.
This matters even more if you’re using a softer loaf or if your kitchen is humid. It’s a tiny step that makes a big difference.
The Foil-Wrap Method vs. Open-Bake for Optimal Cheese Melt
There are two ways to bake it, and each has a purpose.
Open-bake gives you crisp edges and browned cheese. It’s my favorite when I want that bubbly top. Foil-wrap makes everything softer and melts the cheese evenly, almost like a steamy cozy garlic bread situation.
If you want the best of both, do foil for 8 minutes, then unwrap and bake 3 to 5 more minutes. That’s my “everyone wins” method, especially if you’re serving picky eaters who want soft bread but you still want a little color on top.
Advanced Flavor Upgrades: Italian Herbs, Red Pepper Flakes, and Compound Butters
Once you’ve nailed the classic version, upgrades are really fun. You don’t need all of these, just pick one that matches your meal.
Italian herbs make it taste like pizza shop bread. Red pepper flakes add a gentle heat that cuts through the richness. And if you want to feel fancy, make a quick compound butter by mixing butter with herbs, garlic, Parmesan, and a tiny squeeze of lemon.
I’ll also sometimes add a little smoked paprika. Not enough to taste like barbecue, just enough to make people ask, “What is that flavor?” in a good way.
Customizing Your Loaf: Gourmet Variations and Substitutions
This is where you can make it your own without overthinking it.
Try adding thin sliced tomatoes under the cheese for a little freshness. Or add chopped cooked bacon if you want something extra comforting. If you like a sharper bite, swap some mozzarella for provolone. If you want it super bold, add a little crumbled feta on top after baking.
For a lighter feel, use half butter and half olive oil in the spread. It still tastes rich but feels a bit less heavy. This also works great when you’re pairing it with veggies or lighter mains.
Air Fryer Cheesy Garlic Bread: A Quick 10-Minute Alternative
Air fryer garlic bread is a lifesaver when you don’t want to heat the whole oven. Just keep an eye on it because air fryers can brown fast.
Set your air fryer to 350 F. Build the bread the same way, then cook for about 4 to 6 minutes. Check, then add 1 to 2 more minutes if needed. If the top browns too quickly, lower the heat a bit.
It’s perfect for small batches, like when you want a late night snack and you’re trying not to make a huge production out of it.
Roasted Garlic Infusion: Elevating Your Garlic Bread Game
Roasted garlic is sweet, mellow, and honestly addictive. If fresh garlic feels too sharp for you, roasted garlic is the move.
To roast it: cut the top off a garlic head, drizzle with olive oil, wrap in foil, and bake at 400 F for about 35 to 45 minutes until soft. Then squeeze the cloves out and mash into your butter. It tastes deeper and less spicy than raw garlic, and it makes the whole cheesy garlic bread feel a little more special.
You can even mix roasted garlic plus a small amount of fresh garlic for the best of both worlds.
Viral Pull-Apart Garlic Bread: The Ultimate Party Appetizer
If you’re feeding a group, pull-apart garlic bread is a guaranteed hit. Slice the loaf in a crosshatch pattern without cutting all the way through the bottom. Then stuff garlic butter and cheese down into the cracks.
Bake until melty, then serve it right on the pan. People will swarm it. It’s messy in a fun way, and it disappears fast. If you’re hosting, make two loaves. I’m not kidding.
This version is also great for game day because nobody needs a plate. They just grab and go.
What to Serve with Cheesy Garlic Bread: Best Pasta and Soup Pairings
Cheesy garlic bread is basically a best friend to anything saucy or brothy. If you’re wondering what to serve with it, here are my favorites.
Soups: tomato soup, creamy chicken soup, or a big pot of chili. Pasta: anything with marinara, Alfredo, or baked pasta. Salads: a simple Caesar or mixed greens with a tangy dressing helps balance the richness.
I love it with cozy soups because you can dip it and get that buttery, cheesy bite with every spoonful. It makes a regular dinner feel like comfort food on purpose.
Make-Ahead and Freezer Instructions for Easy Meal Prep
You can absolutely prep this ahead, and it’s one of the easiest dinner helpers to keep around.
Make the garlic butter and store it in the fridge for up to 5 days. You can also assemble the whole loaf with butter and cheese, wrap it tightly, and freeze it.
To bake from frozen: unwrap, place on a sheet pan, and bake at 375 F for about 15 to 20 minutes, then broil briefly if you want color. This is great for busy nights when you need a side dish without thinking.
Storage and Reheating Tips: How to Keep Garlic Bread Crispy the Next Day
Leftover cheesy garlic bread is rare, but it happens. The key is reheating it the right way so it doesn’t turn rubbery.
Store leftovers in foil or an airtight container in the fridge for up to 3 days. To reheat, use the oven at 350 F for 8 to 10 minutes. If you want it crisp, unwrap it for the last few minutes. The air fryer also works great for 2 to 3 minutes.
Try not to microwave it unless you’re desperate. The microwave makes the bread soft in a sad way and the cheese can turn chewy.
Common Mistakes to Avoid: Why Your Garlic Bread Is Soggy or Bitter
I’ve made every mistake possible, so here’s the quick list to save you the trouble.
Soggy bread usually comes from melted butter poured on, too much butter, or skipping the quick pre-toast. Bitter garlic can happen when minced garlic sits directly under the broiler too long or when the garlic is old.
Another issue is too much cheese piled high. It feels like a good idea, but thick cheese can melt unevenly and slide off. Go for an even layer instead. You’ll get better melt and better bites.
Cheesy Garlic Bread Nutrition Facts and Dietary Swaps
This is comfort food, so I keep expectations realistic. A typical slice can be higher in calories and sodium because of butter and cheese. If you want to lighten it up, you can.
Easy swaps:
Lower calorie: use a little less butter and add olive oil, plus more herbs for flavor. Lower sodium: choose unsalted butter and go lighter on Parmesan. Gluten free: use your favorite gluten free loaf and pre-toast it so it holds up. Dairy free: use plant butter and dairy free mozzarella style shreds, then bake open so it browns a bit.
I’m all for making it work for your kitchen and your needs. The goal is still that satisfying, warm, cheesy bite.
Common Questions
Can I use pre-minced garlic in a jar?
You can, but it’s milder and sometimes slightly sour. If that’s what you have, use a bit more and add a pinch of garlic powder to boost the flavor.
How do I keep the cheese from sliding off?
Use an even layer of cheese and don’t overload it. Also let it cool for 2 minutes before slicing so the cheese sets a little.
Should I broil it at the end?
If you like browned spots, yes, but watch it closely. Broilers turn perfect into burnt very fast.
Can I make it without Parmesan?
Totally. Mozzarella alone still gives you great melt. If you want extra flavor without Parmesan, add a bit more salt and herbs in the butter.
What’s the best bread if I want it extra crispy?
Go with a French baguette and bake open. It gives you more crunchy edges in every piece.
A Cozy Final Slice and a Little Nudge to Try It
If you take one thing from this post, let it be this: great cheesy garlic bread is all about spreadable garlic butter, a smart cheese blend, and baking it in a way that fits your texture preferences. Once you do it once, it becomes one of those back pocket recipes you’ll use forever. If you want another helpful reference point, I also like checking out Easy Cheesy Garlic Bread – The Recipe Critic for extra inspiration and comparisons. Now go bake a loaf, slice it while it’s warm, and try not to eat the first piece standing at the counter, I dare you.
Print
Cheesy Garlic Bread
- Total Time: 25 minutes
- Yield: 4 servings
Description
Delicious and easy-to-make cheesy garlic bread that pairs perfectly with pasta and soups, featuring a buttery garlic spread and melted mozzarella and parmesan cheeses.
Ingredients
Garlic Butter Spread
- 1/2 cup unsalted butter, softened (You can use salted butter if you adjust the salt accordingly.)
- 4 cloves fresh garlic, minced (Using fresh garlic is recommended for the best flavor.)
- 1/2 teaspoon salt (Adjust based on the saltiness of your cheese.)
- 2 tablespoons fresh parsley, chopped (Dried parsley can be used in a pinch.)
- 1 pinch garlic powder (Optional for added flavor depth.)
- 1 squeeze lemon juice (An optional flavor boost for freshness.)
Bread and Cheese
- 1 loaf Italian bread or French baguette (Choose your preferred bread for texture.)
- 1 cup mozzarella cheese, shredded (Low moisture mozzarella is recommended.)
- 1/2 cup Parmesan cheese, grated (Freshly grated for the best flavor.)
Instructions
Preparation
- Preheat your oven to 400°F (200°C).
- Slice your loaf lengthwise or into rounds if using a baguette.
- Mix the softened butter with minced garlic, salt, parsley, and a pinch of garlic powder until well combined.
Assembly and Baking
- Spread the garlic butter generously over the cut sides of the bread.
- Top with shredded mozzarella and then sprinkle grated Parmesan on top.
- Bake for 10 to 14 minutes, or until the cheese is melted and bubbly.
- Optional: Broil for 1 to 2 minutes for a golden brown top, watching closely.
- Cool for 2 minutes, slice, and serve warm.
Notes
For a crispy, non-soggy bread, pre-toast the sliced bread for 3 to 4 minutes before adding garlic butter. You can also customize the flavors by adding red pepper flakes or using different combinations of herbs.
- Prep Time: 10 minutes
- Cook Time: 15 minutes
- Category: Appetizer, Side Dish
- Cuisine: American, Italian


