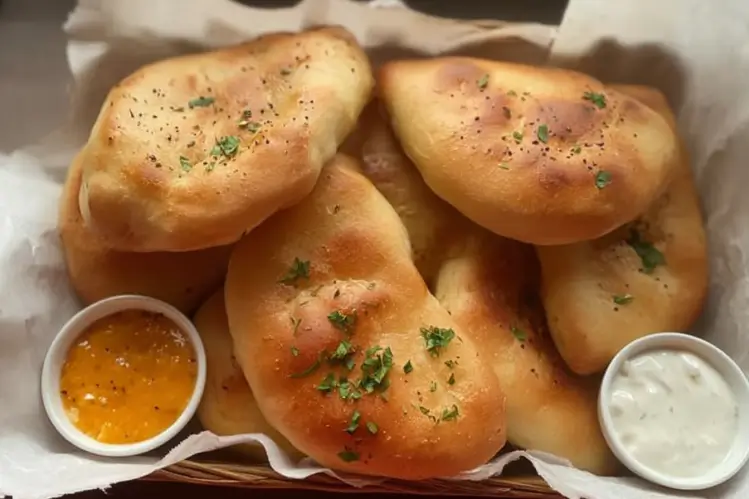
Fried Chicken Buns with Cheese are the answer when you want something cozy, crunchy, and wildly satisfying without needing a restaurant. Picture juicy chicken tucked into fluffy milk bread, melty cheese in the center, and a crisp golden shell that crackles when you bite in. If your week is packed and your cravings are loud, these buns hit that sweet spot between comfort food and party snack. I started making them for game day, then realized they also make an amazing grab-and-go lunch. What I love most is how flexible the flavors are, so you can make them sweet, spicy, or extra cheesy.
Selecting Premium Ingredients: From Japanese Milk Bread Dough to Savory Fillings
Good buns start with good ingredients. The dough is a simple Japanese milk bread style that gives you that soft, pillowy bite. The filling is a mix of chopped chicken thighs, gentle spices, and stretchy cheese that pulls like a dream. Trust me, a few smart choices make a big difference.
- Flour: Bread flour gives the best springy texture. All-purpose works in a pinch.
- Milk: Whole milk for richness. Warm it slightly to help the dough rise.
- Yeast: Instant yeast saves time and blends right in.
- Butter: Unsalted, softened. This keeps the bun tender.
- Chicken: Boneless thighs for juicy meat that stays tender during frying.
- Cheese: Low-moisture mozzarella for pull. Add Gruyère for flavor depth.
- Seasonings: Garlic, onion, pepper, plus a hint of sweet chili or ketjap manis if you want that global twist.
Choose the freshest chicken you can find and grate the cheese yourself. Pre-shredded cheese has starch that can dull the melt.
Dark Meat vs. White Meat: Why Chicken Thighs Are Essential for Juicy Buns
Let me keep it real. Breast meat dries out faster, especially once you chop and fry it inside dough. Thighs take heat like champs and still taste juicy hours later. If you absolutely prefer white meat, bind it with a tablespoon of mayo or a splash of cream before stuffing. But if you want that perfect first bite, go with thighs. You can marinate them for 20 minutes with soy sauce, a pinch of sugar, and garlic to boost the savoriness and lock in moisture.
Master the Dough: Achieving a Fluffy, Pillowy Texture with the Tangzhong Method
This is the secret to that bakery-soft bun. Tangzhong is a quick paste of flour and liquid that traps moisture so your buns stay soft, even the next day.
Quick tangzhong, quick win
Whisk 3 tablespoons bread flour with 1/2 cup milk (or water). Cook over low heat, stirring, until thick like pudding. Cool slightly, then mix into your dough ingredients. That’s it. The dough will feel bouncy, smooth, and easy to shape. Your future self will thank you when leftovers taste like they just came out of the fryer.
Step-by-Step Instructions: Hand-Crafting Your Cheesy Fried Chicken Buns
These steps are beginner friendly. If you can roll a ball and pinch seams, you can do this. I’ll call out little tricks as we go.
- Make the tangzhong and let it cool slightly.
- Mix dough: tangzhong, warm milk, 1 egg, 2 3/4 cups bread flour, 2 tablespoons sugar, 1 teaspoon instant yeast, 1 teaspoon salt, 3 tablespoons butter. Knead until smooth and elastic, about 8 to 10 minutes by hand or 5 minutes in a mixer.
- First rise: place dough in a greased bowl, cover, and let it double in size. About 60 to 90 minutes depending on your kitchen warmth.
- Prep filling: sauté chopped chicken thighs with garlic, a pinch of salt, and black pepper. Cool completely. Stir in diced mozzarella and a little shredded Gruyère.
- Divide dough into 10 to 12 equal pieces. Rest them for 10 minutes so they relax and are easier to shape.
- Fill and seal: flatten a piece, add a spoonful of chicken and cheese, then bring edges together. Pinch firmly and twist slightly to lock. Place seam side down.
- Second rise: cover and let buns puff for 25 to 35 minutes. This gives a better fry.
- Fry: heat oil to 350°F in a heavy pot. Fry 3 to 4 buns at a time until deep golden, about 3 to 4 minutes per side. Drain on a rack.
- Finish: sprinkle with flaky salt while hot. Bite in and enjoy that gentle crunch and gooey middle. If you’ve made Fried Chicken Buns with Cheese before, you’ll notice this version is lighter and fluffier thanks to the tangzhong.
If you prefer a lighter finish, keep reading for my air fryer method.
The Indonesian Twist: Using Ketjap Manis and Sweet Chili for Global Flavor
Want that sweet-salty glaze that makes your buns unforgettable? Stir a teaspoon of ketjap manis and a teaspoon of sweet chili sauce into the chicken after cooking. It gives caramel notes and a mild heat that pairs beautifully with creamy cheese. I like to brush a tiny bit of ketjap on the bun just after frying, then dust with toasted sesame seeds. It is a small move that adds major flavor.
Achieving the Perfect 2026 “Cheese Pull”: Best Blends of Mozzarella and Gruyère
The big question is always cheese. If you want that 2026 social feed cheese pull, go 70 percent low-moisture mozzarella and 30 percent Gruyère. Mozzarella brings stretch, while Gruyère adds nutty flavor and melts smoothly. Keep the cheese cold right before stuffing so it doesn’t melt out during frying. Some folks like a cube of cheese in the center. I prefer shredded since it spreads more evenly and gives you a gooey pocket in every bite.
Professional Sealing Techniques: How to Prevent “Blowouts” During Frying
Pinch, tuck, and chill
Warm dough is your friend until it starts to stretch too thin. After adding the filling, bring edges up, then pinch with the pads of your fingers. Give a gentle twist to tighten. Flip seam side down and roll lightly under your palm to smooth the seam. If the dough feels sticky, dust hands with a touch of flour. Here is the trick pros use: chill the stuffed buns for 8 to 10 minutes before frying. This firms up the cheese and helps the seal set. No leaks, no splatters, just lovely buns.
Comparing Methods: Deep-Frying vs. The 2026 “Crispy-Bake” Air Fryer Hack
Which method fits your day?
Deep-frying gives the most even browning and the shatter-crisp shell. If you are aiming for classic flavor, this is the move. Keep oil fresh, use a thermometer, and don’t crowd the pot.
Air fryer “crispy-bake” is a great weeknight option. Spray buns lightly with oil and air fry at 360°F for 7 to 9 minutes, turning once. The crust is lighter but still crisp, and the inside stays soft. For more ideas on cheesy, air-fried goodness, check out these Air Fryer Chicken Mozzarella Wraps for quick, melty inspiration.
Troubleshooting Your Fry: Maintaining the Ideal 350°F Oil Temperature
Thermometer tricks and timing
Oil temperature drops fast when you add dough. Aim for 350°F to 360°F to start, then adjust the heat as needed. Fry in small batches so the oil recovers quickly. If buns are browning too fast, your oil is too hot. If they are greasy, the oil is too cool. Use a clip-on thermometer or an instant-read. I test by dropping a small pinch of dough in the oil. It should bubble gently, not explode into furious foam.
Regional Variations: Hot Honey, Korean Gochujang, and Nashville Spicy Styles
Once you nail the base recipe, play with sauces. A drizzle of hot honey makes a sweet heat combo that kids and adults both love. For Korean vibes, toss the cooked chicken in a blend of gochujang, rice vinegar, and a touch of sugar before stuffing. If you like it loud, try Nashville-style: cayenne, paprika, brown sugar, and oil to brush over the hot buns. You can also fold in scallions, sesame seeds, or a little kimchi for brightness. Keep the base simple, then dial the flavor where you want it.
Best Dipping Sauces and Sides: Creating a Complete Viral Appetizer Platter
Easy dips and no-fuss sides
Dips make these buns shine on a party platter. I keep a trio ready: garlicky ranch, sweet chili mayo, and a soy-lime glaze. For crunch, add cucumber sticks or a quick slaw. If you are building a game-day spread, pair these buns with something fresh and herby like these Sheet Pan Chicken Pitas with Herby Ranch. The mix of warm buns and crisp greens gives balance and keeps everyone happy.
Make-Ahead and Freeze Guide: Meal Prepping Your Buns for Parties or Ramadan
Planning for a crowd or a long week? You can fully prep ahead. Make the dough and filling, assemble the buns, then freeze on a sheet tray until firm. Transfer to a freezer bag for up to 2 months. Fry straight from frozen at 325°F to allow the center to heat through without burning the outside, then bump to 350°F to finish. Or air fry from frozen at 340°F, adding a few minutes. Reheat leftovers at 325°F in the oven until the center hits 165°F. The texture holds beautifully, which is why I love serving Fried Chicken Buns with Cheese during Ramadan nights and weekend parties.
Common Questions
How do I keep the cheese from leaking?
Chill the stuffed buns for 10 minutes before frying and pinch the seams firmly. Cold cheese plus a tight seal is your best defense.
Can I stuff raw chicken?
I do not recommend it. Pre-cooked chicken prevents undercooked centers and keeps frying time short and safe.
What oil works best?
Neutral oils with high smoke points like canola, peanut, or sunflower. Keep it clean and filter after frying if you plan to reuse.
How big should each bun be?
Aim for golf-ball to small clementine size before filling. Overstuffing can cause blowouts and uneven cooking.
Can I bake instead of fry?
Yes. Brush with egg wash and bake at 375°F for 16 to 20 minutes. The crust will be softer, so finish with a quick pan fry if you want extra crisp.
A Cozy Wrap-Up for Cheese Lovers
We covered everything you need to make Fried Chicken Buns with Cheese that are fluffy, juicy, and perfectly melty. From choosing thighs and using tangzhong to sealing like a pro, these little buns deliver huge satisfaction. If you are feeling spicy, take inspiration from hot honey or gochujang and run with it. For more cheesy fried chicken vibes, I love the heat-meets-creamy idea in this Hot Honey Pimento Cheese Fried Chicken Sandwich by Carla Hall. Now it is your turn to mix, fill, and fry a batch of Fried Chicken Buns with Cheese and watch them vanish off the plate.
Print
Fried Chicken Buns with Cheese
- Total Time: 1 hour 50 minutes
- Yield: 10 buns
Description
Delicious and cozy fried chicken buns filled with gooey cheese, perfect for parties or a grab-and-go lunch.
Ingredients
Dough Ingredients
- 2 3/4 cups bread flour (Use all-purpose flour in a pinch.)
- 1/2 cup whole milk (Warm slightly to help the dough rise.)
- 1 large egg
- 2 tablespoons sugar
- 1 teaspoon instant yeast (Saves time and blends easily.)
- 1 teaspoon salt
- 3 tablespoons unsalted butter (Softened to keep the bun tender.)
- 3 tablespoons bread flour (For making tangzhong.)
Filling Ingredients
- 1 pound boneless chicken thighs (Provides juicy meat.)
- 1 cup low-moisture mozzarella (Provides pull; add Gruyère for depth.)
- 1/2 cup shredded Gruyère (Optional for flavor.)
- 1 clove garlic (Minced.)
- to taste black pepper (For seasoning.)
- 1 teaspoon sweet chili sauce (Optional for a sweet glaze.)
- 1 teaspoon ketjap manis (Optional for a sweet-salty glaze.)
Instructions
Preparation
- Make the tangzhong by whisking 3 tablespoons of bread flour with 1/2 cup of milk over low heat, stirring until thick like pudding.
- Let tangzhong cool slightly, then mix with warm milk, egg, bread flour, sugar, instant yeast, salt, and butter.
- Knead dough until smooth and elastic, about 8 to 10 minutes by hand or 5 minutes in a mixer.
- Place dough in a greased bowl, cover, and let rise until doubled in size, about 60 to 90 minutes.
- Sauté chopped chicken thighs with garlic, salt, and black pepper until cooked. Cool completely, then stir in cheese.
- Divide dough into 10-12 equal pieces and let rest for 10 minutes.
- Flatten each dough piece, add a spoonful of filling, pinch edges tightly, and place seam side down.
- Cover buns and let rise for 25 to 35 minutes.
Cooking
- Heat oil to 350°F and fry 3-4 buns at a time until deep golden, about 3 to 4 minutes per side.
- Drain on a rack and sprinkle with flaky salt while hot.
Notes
For best results, chill filled buns for 8 to 10 minutes before frying to set the filling. For air-frying, spray with oil and cook at 360°F for 7 to 9 minutes, flipping halfway.
- Prep Time: 1 hour 30 minutes
- Cook Time: 20 minutes
- Category: Appetizer, Snack
- Cuisine: American, Asian Fusion


