Hot Italian Sub Sliders are my go to move when I need something warm, cheesy, and basically guaranteed to make people hover around the kitchen. You know those nights when everyone is hungry right now, but you do not feel like building individual sandwiches? This is exactly for that. You bake everything together on soft Hawaiian rolls, slice, and suddenly you look like you tried way harder than you did. The smell alone is enough to make the whole house magically “check on what you’re making.”
Table of Contents
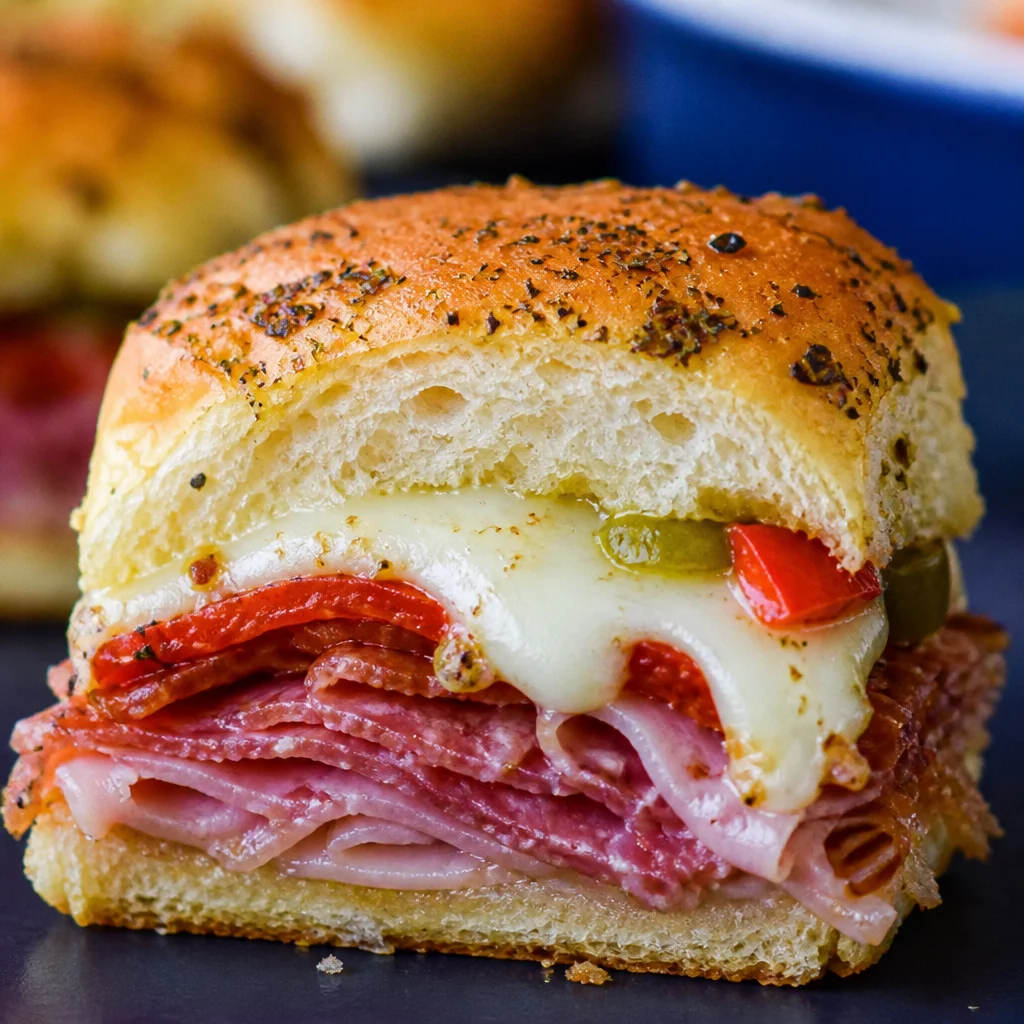
Ingredients for Hot Italian Sub Sliders (Hawaiian Rolls, Deli Meats & Cheeses)
This recipe is simple, but the little choices matter. I like using Hawaiian rolls because they bake up fluffy, slightly sweet, and they hold all that savory filling like champs.
Here’s what I use most of the time:
- 1 pack Hawaiian sweet rolls (12 count)
- Deli meats: salami, pepperoni, ham (about 12 to 16 ounces total)
- Sliced cheese: provolone and mozzarella (about 8 to 12 slices total)
- Optional: banana peppers, sliced red onion, roasted red peppers
- Marinara sauce (for dipping or layering, your call)
- Butter (for topping)
- Garlic powder or fresh minced garlic
- Italian seasoning
- Grated parmesan (optional but very worth it)
If you love Italian style flavors but want something lighter for lunchboxes, I also make these keto Italian sub roll ups and they scratch the same itch without the rolls.
Best Deli Meats for Italian Sliders: Salami, Pepperoni, Ham & Mortadella Options
Let’s talk meat for a second, because this is where the “Italian sub” personality really shows up. You want a mix of spicy, salty, and a little smoky if you can.
My favorite combo: salami + pepperoni + ham. It’s classic, easy to find, and everyone likes it.
Want to level it up a bit? Add mortadella. It’s softer, a little richer, and it makes the sliders feel more deli style. If you like heat, go for hot capicola. If you like mild, stick to sweet capicola or just add extra ham.
One tip from my own trial and error: do not stack the meat too thick in one spot. Spread it out in even layers so every bite tastes the same. Nobody wants one slider that is all meat and the next one that is basically just bread.
Cheese Selection Guide: Provolone, Mozzarella, Havarti & Melty Cheese Combinations
Cheese is where the magic happens, especially once it hits the oven. Provolone is my top pick for that classic sub shop flavor. Mozzarella gives you that gooey pull apart vibe. Together they are pretty much perfect.
Other cheeses that work really well:
Havarti melts beautifully and tastes buttery, so it’s great if you want something a bit softer. Mild cheddar works if that’s what you have, but it changes the flavor away from “Italian sub.” Swiss can be good if you love it with ham, but use it with a light hand.
My personal rule: pick one cheese for flavor (like provolone) and one for melt (like mozzarella). That combo makes the sliders taste bold but still super creamy.
Also, sliced cheese is easier here than shredded, because it covers the whole surface and helps hold everything together when you cut the rolls.
Step-by-Step Instructions for Making Baked Hot Italian Sliders in the Oven
I make these when I want a warm dinner that feels fun, or when people are coming over and I do not want to be stuck assembling plates all night.
Quick steps:
1) Heat your oven to 350 F.
2) Keep the rolls connected. Slice the whole slab in half horizontally like a big sheet.
3) Put the bottom half in a baking dish or on a sheet pan lined with foil.
4) Layer meats evenly, then layer cheese. If you are adding banana peppers or onions, tuck them in between meat and cheese.
5) Add the top half of the rolls.
6) Brush on garlic butter topping (I’ll walk you through that next).
7) Cover loosely with foil and bake about 15 minutes, then uncover and bake 5 to 8 minutes until the tops are golden and the cheese is melted.
8) Rest 5 minutes before slicing. This helps everything set so the sliders do not slide apart.
If you like the colder deli style version too, you should check out these savory cold Italian sliders on Hawaiian rolls for parties where you do not want to turn the oven on.
How to Make Garlic Butter Topping for Golden, Buttery Slider Buns
This topping is why people keep “accidentally” grabbing a second slider. It takes two minutes and makes the tops shiny, flavorful, and a little crisp around the edges.
My garlic butter mix:
Melt 4 tablespoons butter, then stir in 1 teaspoon garlic powder (or 1 to 2 cloves minced garlic), 1 teaspoon Italian seasoning, and a couple tablespoons of grated parmesan if you have it. Brush it generously over the tops and let it drip into the cracks a little. That’s the good stuff.
If you want the tops extra golden, uncover for the last few minutes of baking. Just keep an eye on it, because sweet rolls can go from golden to too dark pretty quickly.
Marinara Sauce and Flavor Enhancers for Authentic Italian Sub Sliders
Here’s the debate: do you put marinara inside the sliders or serve it on the side?
I usually serve marinara on the side for dipping because it keeps things less soggy. But if you love a saucier slider, you can spread a thin layer on the bottom half of the rolls before the meat goes on. Just do not overdo it.
Easy flavor boosters that make these taste like your favorite sub shop:
Banana peppers, a little drizzle of olive oil, a pinch of red pepper flakes, shredded lettuce added after baking, or a quick swipe of sub dressing. If you have Italian dressing, you can lightly brush a tiny amount on the inside of the top rolls after baking. It gives that tangy bite without soaking the bread.
Oven Baking Tips for Perfectly Melted, Crispy, Pull-Apart Sliders
A few small moves make a big difference here.
First, cover with foil for the first part of baking. That traps heat and melts the cheese without burning the tops. Then uncover at the end so the rolls can turn golden.
Second, do not slice right away. I know it’s tempting. But resting for 5 minutes helps the cheese settle and the layers stay stacked when you cut.
Third, if your baking dish is deep, the sides might steam a little. If you like crispier edges, use a sheet pan instead or move the sliders to a sheet pan for the last few minutes uncovered.
Easy Variations of Italian Sub Sliders (Spicy, Vegetarian, Chicken & Deluxe Versions)
Once you’ve made Hot Italian Sub Sliders once, you start messing around with them, and honestly that’s part of the fun.
Spicy version: hot capicola, extra pepperoni, banana peppers, and red pepper flakes in the butter topping.
Chicken version: swap deli meats for shredded chicken plus provolone and a little marinara. If you want a totally different vibe, these buffalo chicken sliders are a spicy crowd favorite too.
Vegetarian version: roasted red peppers, sautéed mushrooms, onions, spinach, and mozzarella. Add a little pesto if you like.
Deluxe version: add mortadella and capicola, and finish with shredded lettuce and a quick drizzle of dressing after baking.
Make-Ahead Instructions for Party-Ready Hot Italian Sliders
If you are hosting, this is where these sliders really shine. You can build the whole tray earlier in the day, cover it, and park it in the fridge.
I recommend waiting to add the garlic butter topping until right before baking. That way the tops do not get too soft while they sit.
Make ahead game plan:
Assemble up to 8 hours ahead, refrigerate covered, then bake when you are ready. If the tray is cold from the fridge, add a few extra minutes to the covered bake time.
How to Store, Reheat, and Freeze Italian Sliders for Meal Prep
Leftovers are honestly great, especially if you reheat them the right way.
Storing: keep sliders in an airtight container in the fridge for up to 3 days.
Reheating: for best results, reheat in the oven at 325 F, covered with foil for 10 to 12 minutes, then uncover for 2 minutes. The microwave works, but the bread gets softer.
Freezing: wrap individual sliders in foil, then place in a freezer bag. Freeze up to 2 months. Thaw overnight in the fridge, then reheat in the oven. If you reheat from frozen, keep them covered longer so the middle heats through.
Serving Ideas for Game Day, Tailgating, Parties & Family Gatherings
These are built for sharing. I love putting the whole tray on the table and letting everyone pull one apart. It feels casual and fun, and it keeps you from playing short order cook.
If you’re doing a party spread with an Italian theme, I also love serving something like this burrata Italian focaccia sandwich recipe alongside, then cutting everything into smaller pieces so people can try a bit of each.
What to Serve With Hot Italian Sub Sliders (Sides, Dips & Drinks)
You do not need much, but the right sides make it feel like a full on feast.
Sides I actually make:
- Chips and a big crunchy pickle bowl
- Simple Caesar salad or chopped Italian salad
- Roasted potatoes or oven fries
- Veggie tray with ranch (easy and everyone snacks on it)
Dips: warm marinara, garlic aioli, or even a little extra Italian dressing for drizzling.
Drinks: iced tea, lemonade, or something bubbly like sparkling water with lemon. If it’s adults only, a light beer or a simple red wine fits right in.
Expert Tips for Avoiding Soggy Sliders and Enhancing Flavor Balance
I’ve made these enough times to know what can go wrong, and it’s usually sogginess or sliders that taste flat.
How to avoid soggy sliders: keep marinara on the side, pat down any wet toppings like roasted peppers, and do not overload with too many juicy ingredients. Also, bake on a sheet pan if you want more airflow and less steaming.
How to keep flavor balanced: use at least one spicy or salty meat (pepperoni or salami), include something tangy (banana peppers are perfect), and do not skip the garlic butter topping. That topping is your final seasoning layer.
If you want your Hot Italian Sub Sliders to taste like a real deli sandwich, finish with something fresh after baking. A handful of shredded lettuce or a few thin onion slices added at the end makes them feel brighter and less heavy.
Common Questions
Can I assemble Hot Italian Sub Sliders the night before?
Yes. Assemble, cover, and refrigerate. Add the garlic butter topping right before baking so the tops stay fluffy.
Do I have to use Hawaiian rolls?
No, but they’re my favorite for this. Any soft slider buns work. Just try to use a connected slab style roll so it’s easy to slice and layer.
How do I keep the cheese from sliding out when I cut them?
Let the baked sliders rest for about 5 minutes, then use a sharp knife and cut straight down. The short rest helps the melted cheese settle.
Can I make them less salty?
Yes. Use more ham or turkey, go lighter on pepperoni, and skip parmesan in the topping. You can also add extra veggies to balance the richness.
What is the best way to serve marinara with these?
Warm marinara in a small bowl for dipping is easiest and keeps the buns from getting soggy.
A Warm Tray Worth Sharing
If you make these once, you’ll see why I keep coming back to Hot Italian Sub Sliders for busy nights and last minute guests. They’re simple, they bake fast, and they hit that cheesy, salty, cozy craving without a lot of work. If you want to compare versions, I liked reading Hot Italian Sub Sliders – The Jam Jar Kitchen and Hot Italian Sub Sliders – Family Fresh Meals because it’s fun seeing how other home cooks do it. Now go grab those rolls and make a tray, and do not be surprised if everyone asks you to make them again next weekend.
Print
Hot Italian Sub Sliders
- Total Time: 35 minutes
- Yield: 12 servings
Description
These sliders are a warm, cheesy delight made with deli meats and cheese, all baked together on soft Hawaiian rolls for a crowd-pleasing dish.
Ingredients
Slider Ingredients
- 1 pack Hawaiian sweet rolls (12 count) (These are fluffy and slightly sweet.)
- 12–16 ounces Deli meats (salami, pepperoni, ham) (Use a mix of spicy, salty, and smoky meats.)
- 8–12 slices Sliced cheese (provolone and mozzarella) (Provolone for flavor, mozzarella for melt.)
- 1 jar Marinara sauce (For dipping or layering.)
- 4 tablespoons Butter (For topping.)
- 1 teaspoon Garlic powder (Or use 1–2 cloves of fresh minced garlic.)
- 1 teaspoon Italian seasoning (For added flavor.)
- 2 tablespoons Grated parmesan (Optional but recommended for topping.)
- Optional toppings (banana peppers, sliced red onion, roasted red peppers) (Add for extra flavor.)
Instructions
Baking Instructions
- Preheat your oven to 350°F.
- Keep the rolls connected and slice the whole slab in half horizontally.
- Put the bottom half in a baking dish or on a sheet pan lined with foil.
- Layer the meats evenly on the bottom half.
- Layer the cheese on top of the meats.
- If using, add banana peppers or onions between the layers.
- Replace the top half of the rolls.
- Brush on the garlic butter topping.
- Cover loosely with foil and bake for about 15 minutes.
- Uncover and bake for an additional 5-8 minutes until the tops are golden and the cheese is melted.
- Allow to rest for 5 minutes before slicing.
Garlic Butter Topping
- Melt 4 tablespoons of butter and stir in 1 teaspoon of garlic powder, 1 teaspoon of Italian seasoning, and grated parmesan if using.
- Brush this mixture generously over the top of the rolls.
Notes
For best results, keep marinara sauce on the side to avoid soggy sliders. Use a sharp knife to cut directly down after letting the sliders rest.
- Prep Time: 15 minutes
- Cook Time: 20 minutes
- Category: Appetizer, Main Course
- Cuisine: Italian


